

The head bloke and the mate handed their swords over, they didn’t smile much at all through that ceremony and geez, it went on for a long time, they weren’t happy. We were but we were on the winning edge. After they were finished, both sides got up off the table and then they had another room and we all had a drink with them.
Navy veteran, Bill McDonald. Read more about his experience.
Japanese surrender
On 15 August 1945, Japanese Emperor Hirohito surrendered to US General Douglas MacArthur aboard the USS Missouri in Tokyo Bay.
Over the following month, Japanese garrisons throughout the Pacific started surrendering. In Bougainville, Australian forces dropped leaflets telling Japanese troops about the Emperor's surrender. They did this to prevent further bloodshed.
On 8 September 1945, the surrender of Japanese forces in Bougainville was signed at Torokina. General Officer Commanding II Australian Corps, Lieutenant General Stanley Savige, accepted the surrender of Lieutenant General Masatane Kanda, commander of the 17th Imperial Japanese Army, and Vice Admiral Tomoshiga Samejima, commander of the 8th Fleet.
Bougainville campaign controversy
The Bougainville campaign was one of the costliest for Australia in the Pacific War in terms of casualties. The campaign didn't affect the outcome of the war, and even at the time, it was controversial. By 1945, Australian forces were being left out of the major US battles that would defeat Japan. They were relegated to 'mopping up' campaigns in Papua and New Guinea, and Borneo.
Throughout 1945, the Bougainville campaign was robustly debated in the Australian Parliament.
It is proper that we should ask what is the objective of this [Bougainville] campaign ... So apparently the objective of the Government was the liquidation of those [90,000 Japanese] troops because they were colonising the islands, and, although not able to continue their aggressive movement towards Australia, they were not impotent. As to the colonisation that was going on, no one can take that seriously ... If there is any colonisation going on, it is very primitive. What then has been the result of the campaign indicated by General Blamey? According to the Acting Minister for the Army, in five months of fighting, during which tens of thousands have been tied up either in operations or in supply, we have accounted for little more than 6,000 killed of the 90,000 Japanese referred to. What has been the cost to Australia of that campaign? I refer to the report of the Acting Minister for the Army ... I suggest that honorable members examine his report very carefully, and if they do, they will reach the conclusion, I think, that, in making out a case for the Government on the matter of equipment, he has, at the same time, made out a most damning indictment of the Government for having undertaken the present campaign at all.
- The Honourable Harold Holt MP, Member for Fawkner, speaking in the Australian House of Representatives, 26 April 1945. Read the full debate.
In the decades since, it has often been portrayed as a waste of Australian lives for minimal gain. But some historians argue that the Bougainville campaign was successful in meeting the government's aims. These included having Australian forces working to liberate Australian territory.
Gallery
Gallery for `Japanese surrender at Bougainville`

Photo: Lieutenant General Kanda signing the Instrument of Surrender

Artefact: Linocut used to print pamphlets announcing Japanese surrender
When news of the impending surrender of Japan reached Torokina, Bougainville on 9 August 1945, the major concern of Australian commanders was to ensure that the Japanese forces were immediately notified of the impending peace, to avoid any unnecessary casualties on either side. The most obvious solution was a leaflet drop, but to save lives, the entire design and production job would have to be done immediately. The task was given to Sergeant Henry Walker, head of production in Bougainville of the Far Eastern Liaison Office.
In five days, Walker and the Mobile Print staff had churned out 900,000 leaflets. They were packed in bundles of about 300 and loaded aboard any aircraft that could fly – Beaufreighters and Boomerangs, C-47s and Wirraways–and dropped over Japanese lines over the ensuing five days. 'It was gratifying to learn later,' says Walker, 'that from 10:30 am on (10 August) not one Japanese shot was fired on the Island despite the fact that their general, Kanda, did not contact any of his troops until 7:30 am on 16 August.'
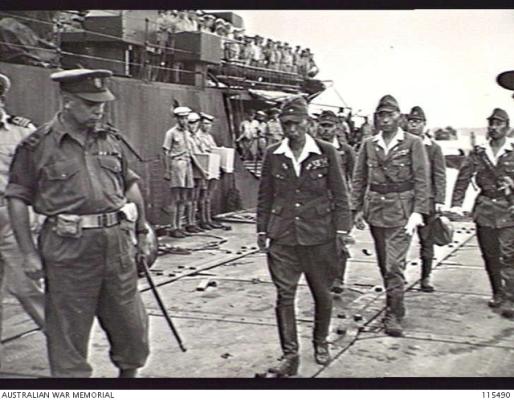
Photo: Japanese officers aboard HMAS Diamatina

Photo: General Savige and Allied officers

Photo: General Savige and Allied commanders waiting for Japanese surrender party

Photo: RAAF and RNZAF crews with surrender leaflets

Photo: Japanese troops from Nauru arrive at Torokina
Depicted in the painting standing (left to right): Sergeant Clement S. Scale, official war photographer, (Military History Section); Major General Ishoshi Makata, Chief of General Staff (Japanese Army); Lieutenant Martin (MH&I photographer); Provost; Brigadier A.R. Garrett (BGS, II Aust. Corps); Lieutenant Commander Masami Shinkawa (interpreter); Group Captain D.R. Chapman (RAAF); Air Commodore G.N. Roberts (RNZAF); Commander A.E. Fowler (RAN - HMAS Diamantina); Colonel J.P. Coursey (US Air Group - Marines); Captain A.J.Drewett (aid de camp to Gen. Savige); Provost.
Seated (left to right): Lieutenant General Masatane Kanda (Commander 17th Japanese Army); Lieutenant General Sir Stanley Savige (GOC, II Aust.Corps); Brigadier S.F. Legge (DA & QMG II Aust. Corps); Vice Admiral Tomoshiga Samejima (Commander 8th Japanese Naval Forces Fleet); Provost; Corporal Stewart (photographer, RNZAF).